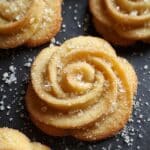
There's something truly comforting about the buttery softness and delicate crumb of a classic Danish Butter Cookies Recipe. The gentle snap when you bite reveals a rich, golden crisp exterior that melts in your mouth, releasing a warm vanilla embrace with every nibble. Whether you're sharing these with friends over tea or sneaking a batch during a quiet afternoon, the magic is in that perfect balance of crisp edges and tender centers. Trust me, these little cookies are worth every moment you spend making them-your kitchen will smell heavenly, and your heart will thank you.

Jump to:
Why You'll Make This Again
This Danish Butter Cookies Recipe is a timeless delight that blends crisp textures and buttery richness in every bite. It's comforting yet elegant, perfect for both casual sharing and special occasions.
- Cozy, reliable comfort: These cookies bring a warm, homey feel with every sweet, melt-in-your-mouth bite.
- Flavor harmony: The gentle vanilla undertones lift the rich butter perfectly, creating a balanced, irresistible flavor.
- Simple pantry ingredients: You'll craft this from things you likely already have at home, no fancy trips needed.
- Perfectly flexible: The dough is easy to shape, pipe, or even roll, letting you personalize the look and feel.
Ingredients That Create Magic

Every ingredient in this Danish Butter Cookies Recipe plays a starring role. The butter not only tenderizes but also delivers that signature rich flavor. Powdered sugar blends smoothly to create a tender crumb, while the vanilla extract adds a warm aromatic lift that feels like a hug in your mouth. I love how using cake flour or all-purpose flour subtly changes the cookie texture - the cake flour gives a softer crumb, while all-purpose yields a more classic bite. Having these ingredients on hand means you're always halfway to joy.
- Heart of the dish: Unsalted butter at room temperature is essential for that creamy, rich base. You can substitute with European-style butter for extra richness or use vegan butter if you want a dairy-free twist.
- Flavor foundation: Powdered sugar keeps the dough silky and avoids any grainy texture. If you don't have powdered sugar, finely ground granulated sugar will work but may change mouthfeel slightly.
- Texture builders: Cake flour is my favorite here for a soft bite, but all-purpose flour is a fine stand-in. For a gluten-free version, try a 1:1 gluten-free baking flour mix.
- Optional sparkle: A pinch of flaky sea salt sprinkled on top before baking adds a delicious depth, and a light dusting of granulated sugar gives a beautiful sparkle and extra crispness.
Good to know: Exact Danish Butter Cookies Recipe measurements are carefully listed in the recipe card below to ensure your batch turns out perfect every time. Precision here means buttery bliss.
Make Danish Butter Cookies Recipe With Ease

Step 1 - Gentle Prep
Start by gathering a stand mixer or handheld mixer, a large mixing bowl, a spatula, plastic wrap, and a piping bag fitted with a star nozzle if you want the classic look. Preheat your oven to 300°F (150°C), and line a baking sheet with parchment or a silicone mat to catch that beautiful golden cookie outline. Softening butter at room temperature is key-it should give just a gentle press with your finger. For an extra treat, you can make the dough earlier in the day and keep it lightly chilled until you're ready to pipe, which helps keep the cookies crisply shaped.
Step 2 - Cook With Love
After you cream the butter, powdered sugar, and vanilla for 5-8 minutes until fluffy and pale-watch for that airy texture-you'll gently fold in the sifted flour in batches. The dough should feel soft but not sticky. If it feels a bit stiff, a tablespoon of warm milk works wonders to loosen it without losing structure. Pipe your dough onto the prepared sheet, then refrigerate the piped cookies for 30 minutes to prevent spreading and keep the shape crisp. Bake them low and slow for about 15 minutes; edges turning lightly golden is the perfect sign. That sweet, buttery aroma will float through your kitchen like a gentle invitation.
Step 3 - Final Loving Touch
When you pull the cookies from the oven, let them rest on the baking sheet for about 10 minutes to firm up as they cool. This step is crucial so they don't break when transferred. If you love a little sparkle, sprinkle granulated sugar on top before baking or add a tiny pinch of flaky sea salt right after baking for a lovely contrast. You'll notice how the cookies develop that crisp snap, signaling they're perfectly done and ready to enjoy.
Little Secrets for Big Results
I've made this Danish Butter Cookies Recipe countless times, and a few small tweaks make all the difference. Take your time creaming the butter and sugar to incorporate air, but be gentle folding in the flour to keep the dough tender. Piping cold dough straight from the fridge keeps edges defined and gives you that classic look. And remember, a short chill before baking helps these delicate cookies hold their shape beautifully.
- Texture perfection: Cream butter and sugar thoroughly until pale and fluffy for melt-in-your-mouth softness.
- Flavor lift: Don't skip the vanilla-it brightens the richness and makes your kitchen smell divine.
- Time-saver: Prepare dough up to a day ahead and chill tightly wrapped for convenience.
- Easy rescue: If piping feels tough, a splash of warm milk softens dough without losing structure.
Serving That Warms Hearts

Beautiful Finishes
A dusting of powdered sugar or a gentle drizzle of melted dark chocolate adds a beautiful flourish to your Danish Butter Cookies Recipe. Fresh herbs like finely chopped mint or basil might sound unusual, but sprinkled lightly, they add a surprising fresh lift. For a little crunch, consider sprinkling toasted almonds or hazelnuts just before baking. A tiny zest of lemon or orange peel grated over the cookies gives a subtle brightness that balances the buttery richness perfectly.
Loving Pairings
Serve your Danish Butter Cookies Recipe alongside a warm cup of Earl Grey or chamomile tea, whose citrusy or floral notes harmonize beautifully. For a richer experience, pair with a creamy hot chocolate or a chilled glass of milk. If you want to elevate the occasion, a small bowl of fresh berries or a simple fruit compote adds a juicy contrast that makes every bite feel special.
Picture-Perfect Plating
Arrange your cookies in gentle stacks or neat rows on a rustic wooden board or a white ceramic platter to highlight their delicate golden color. Adding a sprig of fresh mint or a dusting of powdered sugar on the plate creates enticing contrast. When photographing, shoot in natural light with a shallow depth of field to capture the buttery texture and that inviting golden crisp edge, making your creations almost too beautiful to eat.
Keep Danish Butter Cookies Recipe Fresh
Fridge Care
Store your Danish Butter Cookies in an airtight container at room temperature for up to one week. If your kitchen is warm, a fridge keeps them safe for up to 10 days, though the texture might soften a little. To maintain that lovely crispness, separate layers with parchment paper and avoid stacking too tightly.
Freezer Love
This Danish Butter Cookies Recipe freezes beautifully! Once baked and cooled completely, freeze your cookies in a single layer on a baking sheet, then transfer to a freezer-safe container with parchment layers between. Freeze for up to three months. Thaw gently at room temperature for about 30 minutes before serving-this helps preserve their characteristic snap.
Reheat With Care
If you want to revive that just-baked warmth, pop your cookies in a preheated oven at 275°F (135°C) for 4-5 minutes-watch carefully so they don't overbake or burn. Avoid microwaving as it tends to soften the texture too much. A quick oven reheat refreshes that gentle snap and delicious aroma you love.
Danish Butter Cookies Recipe Questions
Yes, you can use salted butter, but reduce or omit any extra salt in the recipe to avoid over-seasoning. Using unsalted butter is recommended for the best control over flavor.
If your dough feels too stiff or is cracking during piping, it's likely too cold or dry. Adding a tablespoon of warm milk gently softens the dough, making it easier to pipe without cracks.
Absolutely! Substitute the flour with a gluten-free baking blend designed for 1:1 replacement. The texture might be slightly different, but the buttery flavor remains delicious.
Keep your cookies in an airtight container at room temperature for up to a week. Place parchment paper between layers to prevent sticking, and avoid exposure to moisture to maintain their crispness.
Your Danish Butter Cookies Recipe Story
I'd love to hear how your Danish Butter Cookies Recipe turns out! Whether you're experimenting with flavors or perfecting your piping technique, share your story-there's something special about these cookies that bring people together. Don't forget to leave a rating if you try the recipe, and pin it to your Pinterest boards for easy access next time. Happy baking, friend!
PrintPrintable Recipe
Danish Butter Cookies Recipe
Classic Danish Butter Cookies with a delicate, tender texture and rich buttery flavor. These cookies are piped into elegant shapes and baked to golden perfection, perfect for tea time or gifting during the holidays.
- Prep Time: 15 minutes
- Cook Time: 15 minutes
- Total Time: 1 hour (including 30 minutes refrigeration)
- Yield: Approximately 24 cookies
- Category: Cookie
- Method: Baking
- Cuisine: Danish
- Diet: Vegetarian
Ingredients
Cookie Dough
- ½ cup butter at room temperature
- ½ cup powdered sugar
- 1 teaspoon vanilla extract
- 1 cup cake flour OR all-purpose flour
Optional Topping
- Granulated sugar for sprinkling (optional)
- 1 tablespoon warm milk (optional, for softening dough if too stiff)
Instructions
- Prepare the Butter: Take the butter out of the refrigerator at least an hour before baking so it becomes soft to the touch but not melted, ensuring it creams well.
- Cream Ingredients: Using a handheld or stand mixer, cream together the butter, powdered sugar, and vanilla extract for 5 to 8 minutes until the mixture is light in color and fluffy in texture. Scrape down the sides of the bowl as needed to mix evenly.
- Incorporate the Flour: Sift the flour and gradually fold it into the creamed butter mixture in ⅓ cup increments, gently mixing with a spatula until fully combined and a dough forms.
- Prepare Dough for Piping: Transfer the dough onto a sheet of plastic wrap and roll it into a log. Pierce one end of the wrap and insert it into a piping bag fitted with a flower-tipped nozzle (1M open star piping tip).
- Pipe the Cookies: Pipe the dough onto a baking sheet lined with a silicone mat or parchment paper, creating your desired shapes. If the dough is too stiff, add a tablespoon of warm milk to soften it for easier piping.
- Chill the Cookies: Place the baking sheet in the refrigerator for 30 minutes to firm the piped cookies. This step helps the cookies maintain their shape while baking.
- Optional Sugar Sprinkling: Before baking, sprinkle granulated sugar over the cookies if you prefer a bit of crunch and sparkle on top.
- Bake: Preheat your oven to 300°F (150°C, or 148°C fan). Bake the cookies for about 15 minutes or until the edges begin to turn a light golden color.
- Cool and Store: Remove the baking sheet from the oven and allow the cookies to cool on the sheet for 10 minutes. Once completely cooled, store the cookies in an airtight container to maintain freshness.
Notes
- Use cake flour for a lighter, softer cookie texture or all-purpose flour for a slightly denser cookie.
- Ensure the butter is sufficiently softened (not melted) to achieve a fluffy creamed mixture essential for tender cookies.
- The piping bag technique allows for professional-looking shaped cookies; a flower-tipped nozzle is recommended for classic Danish butter cookie shapes.
- If you don't have a piping bag, you can shape the dough by hand, but the distinctive ridged pattern will not form.
- Add a tablespoon of warm milk only if your dough feels too dry or stiff to pipe smoothly, as too much moisture can affect cookie texture.
- Chilling the piped dough prevents spreading and retains cookie shapes during baking.
- Baking at a low temperature (300°F) ensures even cooking without browning too quickly, preserving the buttery flavor and delicate texture.


Leave a Reply