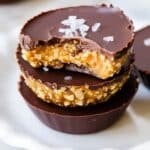
Imagine biting into a chewy, sweet, and nutty little cup that melts warmly in your mouth-that's exactly what the No-Bake Peanut Butter Oat Cups Recipe delivers. The buttery softness of peanut butter combined with the gentle chew of rolled oats creates cozy bites you'll want to reach for again and again. Each bite carries that faintly sticky sweetness from honey, while a glossy drizzle of rich, dark chocolate (if you choose) offers a luscious contrast that feels like a special treat without any fuss. Whether you're brunching at home or need a quick snack on the go, these oat cups are the perfect balance of hearty and indulgent.

Jump to:
- Why You'll Make This Again
- Ingredients That Create Magic
- Make No-Bake Peanut Butter Oat Cups Recipe With Ease
- Little Secrets for Big Results
- Serving That Warms Hearts
- Keep No-Bake Peanut Butter Oat Cups Recipe Fresh
- No-Bake Peanut Butter Oat Cups Recipe Questions
- Your No-Bake Peanut Butter Oat Cups Recipe Story
- Printable Recipe
Why You'll Make This Again
This No-Bake Peanut Butter Oat Cups Recipe checks all the boxes for comfort and convenience. It's a no-fuss, satisfying snack that feels homemade and wholesome without turning on the oven or spending hours in the kitchen.
- Cozy, reliable comfort: I love how the peanut butter and oats pair up to offer that familiar warmth and chewiness perfect for any time of day.
- Flavor harmony: Sweetness from honey meets deep nutty richness with a touch of vanilla and chocolate-you really get a full, satisfying bite.
- Simple pantry ingredients: You probably have all these staples ready, making it easy to whip up whenever the craving strikes.
- Perfectly flexible: Easily swap honey for maple syrup or top with your favorite nuts or dried fruit, adapting it to your taste or dietary needs.
Ingredients That Create Magic

Each ingredient in this No-Bake Peanut Butter Oat Cups Recipe plays an important role. The oats provide the chewy, hearty body, while peanut butter brings creamy richness and that irresistible flavor we all love. Honey or maple syrup acts as the gentle sweetener and the sticky binder, holding everything together. I always recommend natural peanut butter-it has a fresher, less processed taste. For those who prefer a nut-free option, sunflower seed butter can step in beautifully. A pinch of salt sharpens the flavors, especially if you're using unsalted peanut butter. And that optional vanilla extract adds a subtle fragrant lift. For a finishing touch, dark chocolate chips make these cups feel extra special and decadent.
- Heart of the dish: Natural peanut butter is the hero here-look for one with just peanuts and maybe a little salt. Sunflower seed butter is a great allergy-friendly substitute.
- Flavor foundation: Rolled oats give chew and texture. Quick oats could work, but might be softer, losing some body.
- Texture builders: Honey or maple syrup not only sweeten but act as glue. Maple syrup works well for a vegan twist.
- Optional sparkle: Dark chocolate chips add richness and a touch of bittersweet contrast. You can also add shredded coconut or chopped nuts for crunch.
Good to know: Exact No-Bake Peanut Butter Oat Cups Recipe measurements are in the recipe card below.
Make No-Bake Peanut Butter Oat Cups Recipe With Ease

Step 1 - Gentle Prep
Gather a mixing bowl, a spoon or spatula, and a mini muffin tin. For effortless cleanup and easy removal, line your tin with paper cupcake liners or use a flexible silicone tray. This step saves you from sticky fingers later! I usually measure all my ingredients out beforehand-mise en place makes the process smooth and joyful. If you want to save time later, you can mix the dry ingredients and wet ingredients separately a day ahead and combine just before pressing into the cups.
Step 2 - Cook With Love
Since this is a no-bake recipe, the magic happens in your mixing bowl. Stir the oats, peanut butter, honey (or maple syrup), vanilla, and a pinch of salt until everything holds together in a sticky, cohesive mixture. You'll notice the mixture feel dense and pliable, like a fudge batter. Spoon it into the muffin cups, pressing firmly with your fingers or the back of a spoon to shape each cup with a flat bottom and slightly raised edges. If topping with chocolate, melt the chips gently in the microwave in 15-second bursts, stirring well in between - it takes about 1 minute total. A smooth, glossy chocolate drizzle or spread adds a perfect, indulgent aroma and a velvet finish.
Step 3 - Final Loving Touch
Pop the filled muffin tin into the fridge for at least 1 hour to let the cups firm up and develop that perfect bite. If you're impatient like me, try pressing a few mini cups down a little extra-the texture firms up sooner with less air inside. Once chilled, they should hold their shape with a slight give, not crumbly or dry. Go ahead and garnish with a sprinkling of flaked sea salt, extra chopped nuts, or even a fresh herb sprinkle if you're feeling fancy. Those subtle finishing touches make a big difference and elevate this simple snack to something memorable.
Little Secrets for Big Results
I've found that even the simplest no-bake treats shine brighter when you pay attention to a few subtle details. The texture can be a game-changer; slightly under-pressing allows for chewier bites, while more pressure yields firmer cups. Mixing in a pinch of salt really amplifies the depth of sweetness and nutty flavors. I sometimes prepare a double batch and keep extras in the fridge for those "I need a quick bite" moments. And if things get a bit crumbly, just press the mixture back together with a spoon or your hands-it's forgiving!
- Texture perfection: Press the mixture firmly but don't overpack to keep a chewy, tender bite.
- Flavor lift: A pinch of fine sea salt brightens the peanut butter and balances the sweetness.
- Time-saver: Make the mixture ahead and shape right before serving or refrigerate shaped cups for up to 2 days.
- Easy rescue: Crumbles? Just gather crumbs and press them back into shape-no wasted yum.
Serving That Warms Hearts

Beautiful Finishes
Try topping your No-Bake Peanut Butter Oat Cups Recipe with a sprinkle of flaky sea salt or lightly toasted chopped nuts for extra texture and a salty crunch that contrasts so well with the sweetness. A drizzle of extra melted chocolate adds a glossy, rich finish that's as beautiful as it is delicious. For a fresh touch, a tiny leaf of mint or a dusting of cinnamon can lift the flavors unexpectedly. These simple adornments turn a humble snack into a little masterpiece.
Loving Pairings
Complement these oat cups with a warm cup of chai or your favorite herbal tea to balance sweetness with spice. Fresh fruit like sliced apple or pear adds juiciness and brightness on the side. For something heartier, a dollop of Greek yogurt or a small bowl of cottage cheese pairs wonderfully, offering creamy tang. Finally, crunchy veggie sticks with hummus make a well-rounded snack spread alongside these peanut butter cups if you want variety on the table.
Picture-Perfect Plating
Arrange your No-Bake Peanut Butter Oat Cups Recipe on a simple white plate or wooden board to let their golden hues and chocolate shine. Stack a few vertically to create height and visual interest, or line them neatly for a tidy presentation. Wipe the edges of the plate clean for a polished look. When photographing, use natural, soft light and try to capture a close-up that highlights the texture-the tiny oats and shiny chocolate drizzle really beg to be seen up close.
Keep No-Bake Peanut Butter Oat Cups Recipe Fresh
Fridge Care
Store your oat cups in an airtight container in the fridge where they last up to 5 days without losing that perfect chew. Using cupcake liners helps prevent sticking and keeps their shape pristine. After a day or two, if they firm up too much, take them out about 10 minutes before eating-they soften gently at room temperature, bringing back that tender bite.
Freezer Love
These cups freeze really well for up to 3 months. Place them on a parchment-lined tray, freeze until solid, then transfer to a freezer-safe container or bag. When ready to enjoy, thaw in the fridge overnight or leave on the counter for about 30 minutes. Freezing keeps their texture intact, making it easy to have a homemade snack ready anytime.
Reheat With Care
I generally enjoy these oat cups straight from the fridge or at room temperature, but if you prefer warm bites, pop one in the microwave for 10 to 15 seconds. In a pinch, a gentle toast in a dry pan over low heat works, but be careful not to overheat or they'll become crumbly. Adding a tiny splash of water to the microwave can help maintain moisture as you warm.
No-Bake Peanut Butter Oat Cups Recipe Questions
Absolutely! Use maple syrup instead of honey, and make sure your peanut butter doesn't contain any dairy additives. This swaps the recipe to fully plant-based without sacrificing flavor or texture.
Try adding a teaspoon more peanut butter or a drizzle of honey/maple syrup to help bind things together. Mixing thoroughly and pressing firmly into the tin helps the oats absorb moisture and sets them into neat cups.
Definitely! Chopped nuts, dried fruit, shredded coconut, or even a sprinkle of chia seeds add texture and flavor. Just keep additions modest to preserve the structural integrity.
Stored airtight in the fridge, they stay fresh for up to 5 days. For longer storage, freeze for up to 3 months and thaw before eating.
Your No-Bake Peanut Butter Oat Cups Recipe Story
I'd love to hear how you make this No-Bake Peanut Butter Oat Cups Recipe your own. Whether you add a sprinkle of sea salt, mix in your favorite nuts, or double the batch to share, every variation has its charm. If you loved how effortlessly satisfying these cups are, please leave a rating so others can discover this cozy snack too. Don't forget to save this recipe to your Pinterest boards for easy access in busy weeks. It's been such a delight crafting these little no-bake treats with you-I'm already dreaming about the next batch!
PrintPrintable Recipe
No-Bake Peanut Butter Oat Cups Recipe
These No-Bake Peanut Butter Oat Cups are a delicious and healthy snack made with simple ingredients like rolled oats, natural peanut butter, and honey or maple syrup. They combine creamy peanut butter with hearty oats and a touch of sweetness, topped optionally with melted dark chocolate for an indulgent finish. Perfect for a quick energy boost or a guilt-free dessert, these cups require no baking and set quickly in the fridge.
- Prep Time: 10 minutes
- Cook Time: 1 minute
- Total Time: 1 hour 11 minutes
- Yield: 12 mini oat cups
- Category: Snack
- Method: No-Cook
- Cuisine: American
- Diet: Vegetarian
Ingredients
Base Ingredients
- 1 cup rolled oats
- ½ cup natural peanut butter
- ¼ cup honey or maple syrup
- ½ teaspoon vanilla extract (optional)
- Pinch of salt (if using unsalted peanut butter)
Toppings
- ¼ cup dark chocolate chips (optional for topping)
Instructions
- Mix Ingredients: In a mixing bowl, combine the rolled oats, natural peanut butter, honey or maple syrup, vanilla extract if using, and a pinch of salt. Stir well until the mixture is sticky and evenly combined.
- Form Cups: Spoon the mixture into a mini muffin tin lined with cupcake liners or a silicone muffin tray and press firmly to shape the mixture into cup forms.
- Melt Chocolate: In a microwave-safe bowl, melt the dark chocolate chips by heating in 15-second intervals, stirring between each interval until smooth and fully melted.
- Top Cups: Drizzle or spread a small amount of melted chocolate over each oat cup for a delicious finishing touch.
- Chill and Set: Place the muffin tin in the refrigerator for at least 1 hour to allow the cups to firm up and set properly. Once set, carefully remove the cups from the tin and enjoy your no-bake snack.
Notes
- To prevent sticking, use silicone muffin trays or line the tin with cupcake liners.
- Peanut butter can be substituted with almond or cashew butter for a different flavor.
- Adjust sweetness by varying the amount of honey or maple syrup.
- These cups can be stored in an airtight container in the fridge for up to 1 week.
- For a nut-free version, use sunflower seed butter.


Leave a Reply